Showing posts with label Gluten Free Baking. Show all posts

Easy Gluten-Free Dinner Rolls

Gluten Free Dinner Rolls 3 web
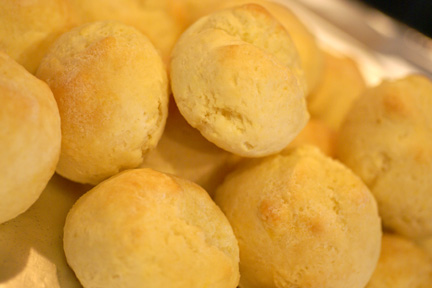
Read more about my EASY gluten-free dinner roll recipe at my new site.

Gluten-Free Cheesecake - better than the original!

While I posted about this gluten-free cheesecake last year when I made it for Thanksgiving, I made it again for the holidays this week. My brother (who does not bestow praise often) declared it the best cheesecake he has ever tasted. It's a great example of simple ingredients bringing out spectacular results. I hope you are enjoying some time with family, friends and perhaps some deliciously simple food.

I live in New York City, a place known for its cheesecake. Before I had Celiac disease, a trip to Carnegie Deli for cheesecake was taken with each new visitor I helped to explore Manhattan. Carnegie Deli cheesecake is delicious, but I was never a fan of the crust. To me a cheesecake needed a graham cracker crust pure and simple.

One of the first gluten free treats I set out to conquer was crust. Pie crust and cheesecake crust – I needed to be a part of the holiday tradition. Well, much to my surprise, I was able to make a crust that is even more delicious with cheesecake than the graham cracker crust for which I had longed. Who knew that eating gluten free would keep delivering these small gifts at my door?

I served this cheesecake for dessert at Thanksgiving this year. I just wish it had fewer calories so I could indulge on a more regular basis!


Gluten Free Cheesecake with Nut Crust Supreme (Cheesecake recipe is from my Aunt Barbara, the crust is adapted from Bette Hagman’s “The Gluten Free Gourmet Bakes Dessert”)

Preheat oven to 350 degrees

Gluten Free Nut Crust Supreme
2 cups Pamela’s Gluten Free Baking Mix
½ cup dark brown sugar
2/3 cup cold unsalted butter, cut into pieces
1 cup finely chopped pecans

Spray cheesecake pan lightly with vegetable oil spray. In a medium bowl stir together the flour mix and brown sugar. Cut in the butter until fine crumbs form. Stir in the nuts and pat into your pan. The crust will be “crumbly” but will hold together once pressed into the pan. This will be more than enough for one large cheesecake and perhaps for a second smaller pie. Though it tastes so good on it’s own you may just end up eating it!

Barbara’s Classic Gluten Free Cheesecake
4 – 8 oz bars of gluten free cream cheese, softened
1 cup of granulated sugar
2 eggs
¼ teaspoon salt
1 teaspoon gluten free vanilla

Mix all of the ingredients with a beater until smooth and pour into the unbaked crust. Place in preheated oven for 30 minutes.

While that is baking, prepare the topping.

2 cups gluten free sour cream
¾ cup granulated sugar
½ teaspoon of gluten free almond extract
Juice from ½ a lemon

Mix the topping ingredients in a bowl. After the first 30 minutes of baking, remove the cheesecake and spoon the topping onto the cheesecake. Be careful not to overfill the pan. Return the cheesecake to the oven and bake for an additional 10-20 minutes. You may want to place a piece of foil under the cheesecake just to catch any drippings. Cooking times can vary dramatically depending upon the amount of topping you choose to use. Watch to see when it starts to solidify but don’t let it stay in so long that the crust begins to burn.

This recipe is easy to make but incredibly scrumptious, I promise.


The Best Gluten-Free Brownies Recipe


My friend Heather, in San Francisco, is a fantastic cook. I take any cooking advice from her as fact. When she recommended a recipe for the BEST BROWNIES EVER, I did not take it lightly. I decided to put her hyperbole to the test and try a gluten-free version for my next party. This was an interesting gluten-free baking experiment because there were so many new factors – I was trying a new recipe, a new gluten-free flour mix and a new cooking technique – The Baker’s Edge pan. I usually stick to one new element for my cooking experiments, but fate smiled upon me and despite all of the previously untried factors the brownies lived up to Heather’s declaration as the best (gluten-free) brownies ever.


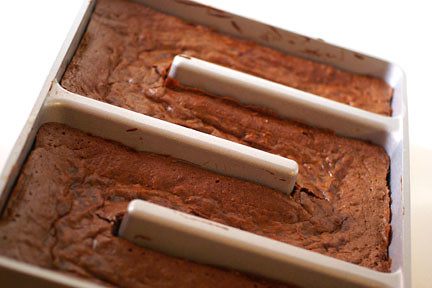
I highly recommend the Baker's Edge pan. I first discovered it when I was experimenting with a gluten-free version of David Lebovitz's Fruit and Nut Bar recipe. I worried that it would be difficult to get the brownies out of the pan or to clean up afterwards, but it really worked like a dream. It's a bit of a luxury, but how many luxurious things in today's world cost less than $40?


The Best Gluten-Free Brownies Recipe (adapted from the Tartine Bakery Recipe)

3/4 cup unsalted butter
1 pound gluten-free bittersweet chocolate, coarsely chopped
3/4 cup gluten-free flour mix (I used Deby’s Gluten-Free flour mix – made with rice flour, potato starch, tapioca flour, salt, and xanthan gum)
5 large eggs plus 1 egg white
2 cups light brown sugar, lightly packed
1/ 2 teaspoon salt
1 teaspoon vanilla extract

Preheat the oven to 350 degrees. Butter a 9-by-13 inch glass baking dish.

In a small saucepan, melt the butter over low heat. Melt the chocolate in a double boiler and add the melted butter. Remove from the heat and set aside to cool.

Sift the flour into a small mixing bowl. Set aside. In a medium mixing bowl, combine the eggs, sugar, salt and vanilla. Using a mixer fitted with the whisk attachment, beat on high speed until the mixture thickens and becomes pale in color and falls from the beater in a wide ribbon that folds back on itself and slowly dissolves on the surface, 4 to 5 minutes.

Using a rubber spatula, fold the cooled chocolate into the egg mixture. Add the flour and fold it in quickly but gently with the rubber spatula so that you don't deflate the air that's been incorporated into the eggs.

Pour the batter into the prepared dish and smooth the top with the spatula.

Bake until the top looks slightly cracked and feels soft to the touch, 25-30 minutes. Let cool completely on a wire rack.


Using a sharp knife, cut into squares. The brownies will keep in an airtight container in a cool place for up to 1 week. Though I can't imagine them sitting around for that long - they are just that good.


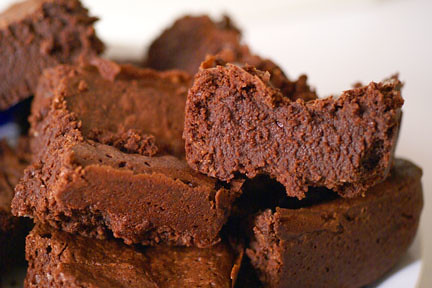
You can't use a cake tester or toothpick to judge doneness. Because the batter has a high percentage of chocolate, the tester comes out wet even if the brownies are done. But look at that gooey chocolate goodness!

Friendship Bars with a Gluten Free Twist

One of the new recipes I tried this weekend (when my gluten free bakery dreams were crushed) turned out so well it would seem that fate had its wise hand in it all from the beginning. What better to make for a group of girlfriends sitting around in a NY apartment watching hilarious television than a treat called a Friendship Bar? (Our sides and cheeks were hurting from the hilarity on The Office and Da Ali G Show in case you were wondering.)

I stayed mostly true to David's original recipe. I used sorghum flour and added a 1/2 teaspoon of almond extract. The almond extract adds a really nice hint of flavor. Since I wasn't able to find the "Baker's Edge" pan he raves about in his post, I decided to bake the mixture in two loaf pans rather than the 8X8 pan in order to maximize the "crusty edges" of the batch.

These are so chewy and perfect - you simply must try this recipe. I still can't believe there is no added fat other than the walnuts. Let me know how they turn out for you.

Gluten Free Friendship Bars (adapted from David Lebovitz's The Sweet Life in Paris)
About 16 bars


6 tablespoons sorghum flour
1/8 teaspoon baking soda
1/8 teaspoon baking powder
1/4 teaspoon salt
6 tablespoons packed, light or dark brown sugar
2 cups walnuts toasted and coarsely chopped
1½ cups dates, pitted and quartered
1 cup dried apricot halves quartered
1 extra large egg
½ teaspoon vanilla extract
½ teaspoon almond extract

Preheat oven to 325 degrees


Line two 8X4-inch loaf pans or one 8-inch square pan across the bottom and up the sides with aluminum foil

In a large bowl mix together the flour, baking powder, baking soda, and salt. Add the brown sugar and stir, breaking up the packed sugar. Add the walnuts, dates, and apricots. Use your fingers to mix separating any pieces sticking together, ensuring that all of the fruit is coated with the flour mixture.

Beat the egg, vanilla, and almond extract in a small bowl, then mix with the fruit and nut mixture until evenly coated. Spread the mixture in the baking pan with your hands and press to even it out. It is pretty gooey at this point.

Bake for 35-40 minutes until the batter is golden brown and has pulled away just-slightly from the sides of the pan. Cool the bars in the pan. It will be tempting to take them out of the oven too early but the bars won't set if you do. Once the bars are cooled, peel off the foil, cut and serve.

Celebrate Love with a Gluten Free Cupcake


Valentine's day is the perfect opportunity to flex your gluten free baking muscles and create some sweet treats.

Cupcakes have been the trendy baked good of choice in Manhattan ever since the Magnolia Bakery introduced us all to the delight of vanilla buttercream frosting. When I moved to NYC, it didn’t take long before my cousin brought me to the West Village to experience Magnolia’s famous cupcakes. When I found out that they had a cookbook I started experimenting with their recipes on my own. I discovered that it wasn’t that difficult to make the frosting and that a yellow cake mix tasted just as good as the much more labor intensive cupcake recipe. I started bringing my “Magnolia Style” cupcakes to dinner parties, birthday parties, and any celebration in need of such an indulgence.

Once gluten was banned from my life, I went in search of a gluten free cake recipe that rivaled my previous concoctions. I spent hours on the weekend trying every vanilla and yellow cake mix and recipe I could find. I made my roommates try all of the results.

“Too grainy.”
“Tastes like cornbread”
“Ummm, not good”

They would look at me with sad eyes, knowing how much I needed to find a recipe that could bring back some sense of normalcy to my new gluten free lifestyle. After trying upwards of 15 recipes and mixes, I started to give up hope that I could make cupcakes that rivaled my old glory.
The Really Great Food Company yellow cake mix is pretty good and the Dowd and Rogers Dark Vanilla cake mix with chestnut flower is delicious in it’s own right, but it's not the same as a simple yellow cake. While I have embraced many of the new flavors and textures that gluten free cooking has brought into my life, I needed that small yellow cupcake. Thankfully, shortly after I had given up hope, someone on the Delphi forums posted a surprisingly simple technique for yellow cake that she claimed had ‘never-failed’ her. I decided to give it one more shot but didn’t get my hopes up. I mean, orange juice in a cupcake recipe? How could that be any good? Wouldn’t it taste like oranges? Well, it worked and it worked really well. It’s moist and delicious and just as good if not better than any ‘gluten’ cupcake. The hint of orange is only detectable when you know it’s there.


Celebratory Cupcakes

Yellow Gluten Free Cupcakes (adapted from the Celiac Disease Delphi Forums)
1 package Gluten Free Pantry Old Fashioned cake mix*

1 package Jello vanilla instant pudding
1/2 cup sugar
4 extra large eggs room temperature
1/2 cup canola oil
3/4 C orange juice
1 Tablespoon plus 2 teaspoons good vanilla extract

*Do not follow the directions on the package

Preheat the oven to 350 degrees.

Mix the wet ingredients in a large bowl. Add the dry ingredients and beat on high speed for two minutes.

Line a muffin tin with cupcake liners. Fill liners 2/3 to ¾ of the way full.

Bake for about 25 minutes, until the cupcakes are golden and a toothpick inserted comes out clean. If making a cake, grease the pan first, pour in the mix and bake for 40-45 minutes.

Vanilla Buttercream Frosting (adapted from Domino Sugar)
1 pound confectioner’s sugar
1 stick (8T) of good unsalted butter, softened
2 teaspoons good vanilla extract
¼ cup of milk

Combine half of the sugar with the butter and beat on low speed. Add the wet ingredients and beat. Slowly add the rest of the sugar while mixing until combined. Beat on medium-high speed for at least two minutes until the frosting is smooth and creamy. If you want the frosting to be a little bit stiffer (better for decorating) add powdered sugar a couple of tablespoons at a time. Frost cupcakes with icing at room temperature.

Tip - I find if I am going to a party that cupcakes are difficult to transport already frosted. Instead I keep the cupcakes and frosting in separate Ziploc bags or Tupperware containers and then frost them quickly upon arrival. They may not be pretty but they will taste good. This recipe stood up against cupcakes made by a professional working at Martha Stewart! Making homemade frosting is key – it doesn’t take that much extra effort on your part but it will take your baked goods to the next level.

Gluten Free Bread That Actually Tastes Good


The first week I started eating gluten free I tried at least 10 different gluten free bread mixes. Some would seem promising during the preparation, a nice dough and balanced yeasty flavor. Others failed even before the baking process began. Unfortunately everything I tried gave me a less than desirable final product. Heavy, bricks of gluten free “bread.” (using the term bread very loosely)

I decided to give up on mixes and started trying different recipes from scratch. I finally found a delicious Almond Bread recipe that Mireille from Delphi forums had recommended. I have included that recipe here, but I also have recently discovered a french bread mix that lived up to all of my expectations.

I made Mona’s French Bread mix during my last trip home. I don’t think I have ever enjoyed the beautiful taste of butter melting on a piece of crusty warm bread so thoroughly. My Mom, the bread expert proclaimed “Wow, Cat this is really good, I would have NO idea it was gluten free!”


So don’t give up hope on gluten free bread if you’ve had a few unsuccessful attempts – you have options – it sometimes just takes a little experimentation to get there.

Gluten Free Almond Bread (From Mireille at the Delphi Forums)
1 cup Asian rice flour

1 cup tapioca flour

1 cup almond flour

2 3/4 teaspoons xanthan gum

2 3/4 teaspoons active dry yeast

2 teaspoons of sugar

1 1/2 teaspoon salt

2 teaspoons gelatin (replace with agar-agar if you can’t use gelatin)

1/2 teaspoon egg replacer (can be found at most health food stores – I use Ener-G Foods)

1/2 cup good quality grated Parmesan cheese

3 extra large eggs room temperature

2 Tablespoons honey

3 Tablespoons oil

1 teaspoon gf cider or reg. vinegar

1/2 teaspoon gf almond extract

1 1/4 cup warm water

Preheat the oven to 375 degrees Fahrenheit

To proof the yeast and make sure it's active, add the yeast to 1/4 cup warm water (between 110 and 115 degrees F) and stir to dissolve. (Make sure that the water is just barely warm. If it feels uncomfortably hot, it will probably kill the yeast.) Add the two teaspoons of sugar and let the yeast sit for five to ten minutes. When the yeast is foamy and smells like bread, it's ready to use.


Mix the dry ingredients in a large bowl or stand mixer. Add the eggs, honey, oil, vinegar, almond extract and mix on medium speed for 2 minutes. Add ½ cup of the water and the yeast mixture and beat for 1 minute. Continue to add water and mix until the dough is slightly thicker than a cake batter. Pour the mixture into a greased bread pan and let it rise, covered in a warm place. Don’t be tempted to let it “over-rise” – just let it rise ½ inch.

Place the pan in the preheated oven and bake at 375 for about 45 minutes or until a toothpick comes out clean. Cover with foil after 20 minutes to keep the top from burning.
Serve warm with butter or preserves. Enjoy!

Gluten Free Oatmeal Cranberry Delights!


When I was first diagnosed with celiac disease I was surprised to find out how much I would need to be vigilant about cross-contamination. In fact, oats are forbidden on a gluten free diet because they are contaminated by wheat in the production process.

In the last two years there has been some controversy in the Celiac community surrounding the safety of steel-cut oats such as McCann’s Irish Oats. Because of the length of time it took me to get my antibodies down I have not been comfortable using McCann’s, however I did decide to try a new brand of “gluten free oats” produced by Cream Hill Estates. They are quite expensive - $5 for a 500g box. But for someone who used to have oatmeal for breakfast everyday – I was glad to have the option even if it was pricey.

I couldn’t wait to make oatmeal cookies – my favorite cookie growing up. I adapted the Quaker Oats “Vanishing Oatmeal Cookies” recipe to create a crispy yet slightly chewy gluten free oatmeal cranberry cookie.

Gluten Free Oatmeal Cranberry Delights

14 Tablespoons unsalted butter
1 cup firmly packed brown sugar
½ cup granulated sugar
2 large eggs
2 teaspoons good vanilla extract
1 ½ cups Pamela’s baking mix
2 teaspoons cinnamon
3 cups gluten free oats
1 1/3 cups dried cranberries

Preheat oven to 350 degrees.

In a large bowl, cream together the butter and sugars with a mixer at medium speed. Add the eggs and vanilla and mix until smooth.

Gradually add the baking mix and cinnamon and mix on low until smooth.


Stir in the oats and cranberries until evenly distributed.


Drop in small teaspoons-full on a silpat or slightly greased cookie sheet. Allow plenty of room for them to spread during baking. Bake for 10-15 minutes. Cooking times will vary according to the size of the cookie. Let cool before removing from the silpat or cookie sheet or they could crumble.

Adjustments for other gluten free flour mixes – because Pamela’s mix includes baking soda, salt and additional fat I adjusted the recipe accordingly. If your flour mix doesn’t have any fat, increase the butter by two tablespoons. Add 1 teaspoon baking soda and ½ teaspoon salt with the dry ingredients if your mix doesn’t include them already.

My step-father claims to be an “oatmeal cookie expert” and he couldn’t get enough. I hope you enjoy them as much as we did!

I Heart Gluten Free Gingerbread


In keeping with a holiday theme, I have been eating and cooking with ginger as much as possible. A few weeks ago, I saw this post about a too good to be true gluten free gingerbread cookie mix that you could actually roll out. I had retired my cookie cutters since I started baking gluten free cookies, but I knew I had to give these a try.

Mona’s mix worked splendidly. Her directions advise you to roll out small sections of cold dough while keeping the rest of the dough in the fridge. I found this to be imperative. As the dough warmed, it became more and more difficult to transfer the cookies to the parchment lined cookie sheets.


I highly recommend this mix. As my picky gluten eating Mom tasted these she said “Wow, you would never know they were gluten free.” That’s high praise from someone who could happily exist on just pastries and cookies. And for those of you that miss rolling out cookies and using fun cookie cutter shapes, you will be happy before you ever eat a gluten free gingerbread man.


Happy (gluten free) Holidays!

A Gluten Free Flour Mix You Will Love


Every person who experiments with gluten free baking finds a flour mix that seems to work for them. I feel as though I have tried every "general purpose" gluten free flour mix out there. I recently had mixed success using Pamela's. The taste and texture is nice but it required a bit of playing with the original gluten version of the recipe.
While this mix requires a bit of effort to put together, the final product behaves almost exactly like general all purpose white flour. When I first discovered this mix I really loved touching it. Many gluten free flours have slightly different (not worse or better) textures. I was amazed to find that this mix had the familiar texture of the flour I used for years before becoming gluten free.
If you have a flour mix that works for you, I'm not trying to convince you to switch. But if you are still looking - you won't regret giving this one a try.
Mireille's All Purpose Gluten Free Flour Mix (from Delphi Forums)
4 cups Brown rice flour
1 1/2 cups Sweet rice flour
1 cup Tapioca Starch Flour
1 cup Rice polish (no longer avail from Ener-G Foods - use Rice Bran instead)
1 tablespoon Guar or Xanthan Gum
1/4 t. ascorbic acid (powdered version available at Trader Joe's)
2 T. unflavored gelatin
Last two ingredients hold baked goods together better.
Whisk all ingredients together.
Tip: Make large batches and store in plastic zip lock bags in freezer.

Gluten Free Orange Vanilla Dream Cookies


I was invited to a Cookie Exchange party this weekend by my lovely friend Molly. The rules were to bring 5 dozen cookies (no chocolate chip) and an empty box so that you could take home some of the cookies everyone else brought. I was excited to have an excuse to make some cookies even though I knew I wouldn’t be able to take anyone else’s cookies home with me.

Since the party was on Saturday I decided to spend Friday night at home experimenting in my little gluten free kitchen. It was 5 degrees Fahrenheit outside so I couldn’t imagine a better way to avoid exposure to the elements.


When I bake gluten free versions of cookies, cakes, pies etc I do not accept anything less than delicious. I don’t see any reason to waste the calories or effort on gluten free substitutions if they are just “so-so.” I decided to try a new flour mix with a tried and true recipe. That said, it takes patience and experimentation to develop the correct formula with gluten free baked goods.

Here is the recipe I started with:

Gluten Free Orange Vanilla Dream Cookies (adapted from the Magnolia Bakery Cookbook)

2 cups gluten free flour mix
¾ teaspoon baking powder
½ teaspoon salt
1 cup (2 sticks) unsalted butter, softened
½ cup granulated sugar
½ cup firmly backed brown sugar
1 large egg, at room temperature
1 tablespoon grated orange zest
1 cup vanilla chips (I used Guittard brand)

Preheat oven to 350 degrees

Sift together the dry ingredients. In a separate bowl, cream the butter with the sugars until smooth. Add the egg and mix well. Add the flour mixture and beat thoroughly. Stir in the orange zest and vanilla chips. Drop by rounded teaspoonfuls onto parchment paper or aluminum foil leaving several inches for expansion. Bake for 10-12 minutes or until lightly golden brown. Move the foil or parchment paper to a rack to cool then remove the cookies from the foil or paper once the cookies are completely cool.

The “gluten” version of the recipe calls for slightly more flour but the gluten free flour blend I had been using needed to be cut to 2 cups. So this time, experimenting with Pamela’s baking mix I tried baking a test cookie after adding the dry ingredients but before adding the zest or vanilla chips.


It tasted great but flattened out completely. So I added more of the gluten free mix and stirred in the zest and vanilla chips. Well, it wasn’t quite the right combination because this is what I how my first tray turned out.


Ok, so I knew I needed more flour. When I confirmed that I had enough flour, by testing one cookie rather than a whole tray, I had to add an extra egg white for texture and more orange zest and vanilla chips to balance out the flavor. I like the flavor and convenience of Pamela’s baking mix. The final version turned out great. The cookies were light and crispy, as good as any of the other cookies at the party. (or so I am told since I could only have the gluten free ones!)

Orange Zest!


I love how the use of a citrus zest flavors baked goods. However, having the right tool - a microplane grater - makes getting zest exponentially easier. I bought my microplane five years ago and it was a revelation. I no longer shuddered at the amount of energy it would take for me to get the tablespoon of zest required for a recipe. When I was home for Thankgiving, my mom used the microplane for the first time. Her oohs and ahhs reminded me of what an incredible tool it is. Yet someone like my mom who has been baking for years had never seen one before.

So if any of you out there don't have one yet, do yourself a favor and spend $10-15 for one more tool to clutter up your kitchen drawer. You won't regret it. The versions that have come out since I bought mine even have convenient handles and plastic covers.

When you are zesting an orange (or lemon or lime) wash and dry the fruit thoroughly. As you are zesting be sure to stop as soon as you reach the pith. (The white pith won't add flavor or moisture to your baked goods so don't expend that extra energy.) After you get all of the zest off of the outside of the fruit, you can keep the orange in the fridge and peel and eat it later.
I used the zest pictured above for some yummy orange vanilla cookies I will write about tomorrow.

Gluten Free Pumpkin Pie Made Easy


While the cheesecake I made on Thanksgiving was great, the meal wouldn’t have been complete without gluten free pumpkin pie. Luckily, Libby’s pumpkin and the recipe on the can is naturally gluten free. That leaves only the crust to make.

Now I know many people buy pre-made pie crusts – well not in my family. The thought of buying a pre-made crust or even a whole pre-made pie would never cross our minds. Well, I’m sure figuring out a gluten free pie crust becomes that much harder if you are used to buying a pre-prepared curst or pie.

There are a wealth of gluten free pie crust recipes that require one to purchase multiple types of flour and ingredients such as xanthan or guar gum. Well lucky for us The Gluten Free Pantry makes a “Perfect Pie Crust” mix to help out those of us without the time or inclination to experiment with flours every time we bake.

It’s not as easy to roll out or work with as a crust made with gluten flour, but the final product is the perfect balance of flaky and sweet to complement a pumpkin pie. I follow the directions on the package with a few hints.

It is absolutely necessary to refrigerate the crust before rolling it out.
Lightly spray two pieces of plastic wrap and roll the crust out between the two sheets. Hold the pan above the crust to check for size. (While the instructions say that the mix will make four pie crusts, I find it much easier to work with it for three pies to allow more “wiggle room.”) To place the crust in the pan, remove the top piece of plastic wrap, slide your hand gently underneath the bottom sheet then with your other hand, place the pan on top of the crust upside down. Flip it all over and hopefully the crust is about centered. Remove the last piece of plastic wrap, cut the edges of the crust off and smooth out any uneven parts gently with your hands. Voila, fill the crust with the pie filling and bake!